Start your adventures in Azeroth by learning how to interact with the world and fight enemies!
In the first three parts of this series for new players, we looked at how to set up your account, create a character, and explored the World of Warcraft user interface. Now it’s time for the fun part… playing the game! In this guide, we will cover the basics of character movement, questing, and combat in World of Warcraft.
3 Ways to move your character in World of Warcraft
Okay, it might seem a little silly to have a section all about how to move your character. After all, you’re probably a gamer, so how hard can it be?
Hear me out.
There are a few different ways you can move, and some of them are going to save you time and make you a better player.
1. Moving with the keyboard
Moving your character is simple and straightforward in World of Warcraft. The default setup is to move with the ‘WASD’ keys on your keyboard. The ‘W’ key moves you forward. The ‘S’ key walks back slowly and the ‘A’ and ‘D’ keys turn your character left and right, respectively.
The spacebar can also be used to make your character jump.
Additionally, you can use the ‘Q’ and ‘E’ keys to perform a strafe — a run that allows your character to continue facing forward while moving sideways. Your other hand can now use the mouse to interact with objects in the world or icons on your screen.
The only downside is that using the keyboard to turn your character or back peddle can be really slow. For general content, that isn’t the worst thing, but if you decide to get into player vs. player (PvP) modes like arena, you’ll want to know how to use mouse movement.
2. Mouse movement
If you hold down the left and right-click buttons on your mouse simultaneously, without moving your hand, your character will move forward in a straight line.
Holding the left mouse button and moving the mouse, will rotate the camera around your character. Additionally, you can change how zoomed in your camera is by scrolling the mouse wheel forward or backward.
Conversely, if you hold down the right button and move the mouse, your character will change the direction they are facing, allowing you to turn faster than with your keyboard.
On the other hand, if you hold both buttons and move your mouse, you will run forward and can turn much faster than the keyboard.
Feel free to jump into the game and play around with mouse movement and see what feels good for you. If you are interested in more tips on how to use mouse movement in World of Warcraft, check out this video:
3. Autorun
Another important movement tool is the Autorun feature. By default, it is set to your ‘num lock’ key on Windows or ‘Clear’ on Mac. As the name implies, it is a button that you can push to lock your character into a forward run. It is like cruise control for your character. With it enabled you will continue to move forward until you press ‘W’, and ‘S’ or hold down your mouse buttons. This means you can continue to turn your character with the traditional methods while autorunning.
If you take nothing else from this guide, make sure you give Autorun a try because it makes tasks like running across a long field or flying over a large zone much nicer.
How to Gain Experience and Level Up In WoW
Now that you know how to move your character, it is time to begin leveling. In the current version of the game, you can increase your character level from 1 to 70.
In order to level up your character you need to gain experience (XP). As mentioned in part 3 of this guide, a bar to track your experience is shown in the bottom-center of the screen in purple or blue.
A purple bar indicates that you will receive XP at the normal rate.
A blue bar means that you will gain XP a little faster because your character is rested. You can “rest” your character by logging out at an inn or in a large city. You will know that it is a rested area if ‘ZZZ’ appears in your character’s health frame in the top left.
There are a few major activities that reward experience:
- Quests (including dungeon quests and queuing bonuses)
- Killing monsters
- Collecting herbs or metallic ores (need herbalism/mining professions)
- Exploring a new area
- Player-vs-player battlegrounds
Of all of these activities, the majority of your experience will likely come from quests and slaying monsters, so we will focus on those for the remainder of this guide.
How to Quest in World of Warcraft
Types of quests
Quests are objectives that can be obtained from non-player characters (NPCs) in-game. In general, quests take on a few different forms, the most common of which include:
- Killing enemies
- Collecting items
- Collect items from slain enemies
- Finding another NPC / Deliver item(s) to NPC
- Escort an NPC
There are a few other types of quests but these are the ones you will see the most. This guide will focus on how to read quests so you will be prepared for any type of quest thrown your way.
How to Accept Quests
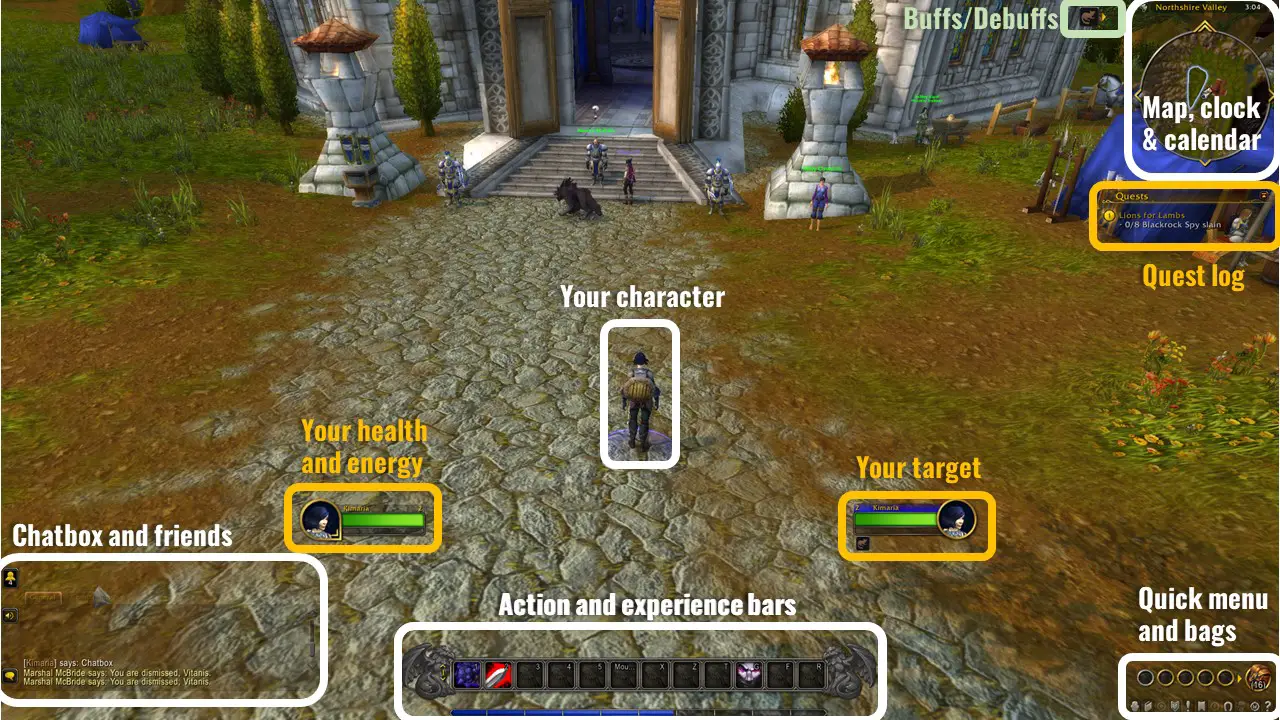
You’ll know that a quest is available when you see an NPC with an exclamation mark above its head in the distance. The location of this quest giver is also shown on the minimap.
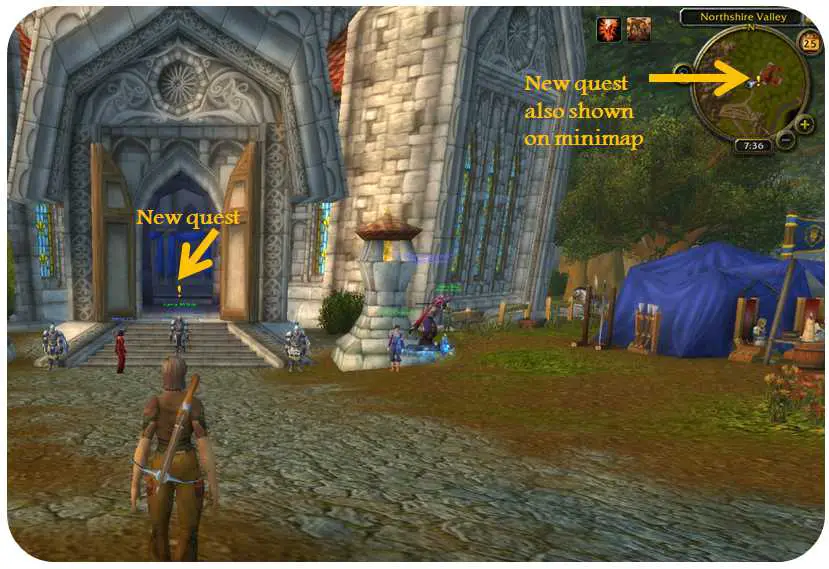
To accept the quest, we need to approach the NPC and left-click on them. If you are too far away, you will hear your character tell you that you are too far away, and a red warning that says, “You need to be closer to interact with that target” will pop up on the screen.
Upon clicking on the NPC, Marshal McBride, in this case, a window will pop up on your screen. This window will provide you with the quest title, backstory, objectives, and reward.
The quest log and minimap
After accepting, the quest will also appear in your tracked quests list below your minimap on the right side. You can hold shift and click on a quest to remove it from the list. To add quests to the list, you can open the quest log (keyboard shortcut ‘L’) and Shift + Click the one you want to track.
A shaded area is also added to your minimap after accepting a quest. This light blue shaded area gives you a rough guide as to where you might find the enemies you need to slay, items to collect, or a person to talk to.
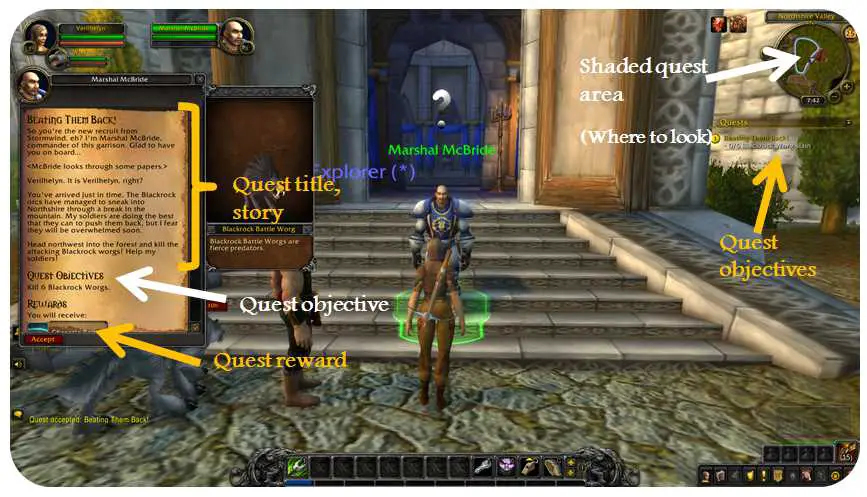
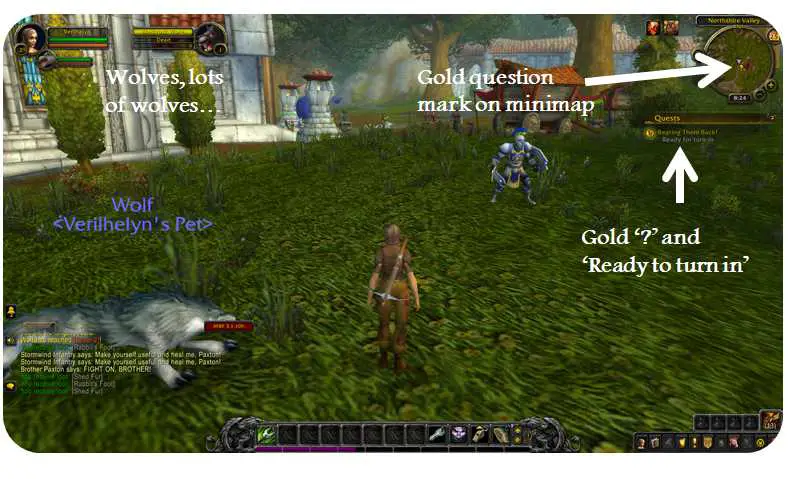
After speaking to Marshal McBride, he gives us a quest called “Beating Them Back” and asks us to kill 6 Blackrock Worgs. To the right of the quest accepting box, we are also shown an image of what the Blackrock Worgs look like.
We now know we need to kill 6 of these wolves and know where to find them with help from the minimap-shaded area. As a side note, the shaded area will also be displayed if you press ‘M’ on your keyboard for the full map popup.
Our first quest: Introduction to combat
Alright, it is time to dive into our first quest.
Unfortunately, it is going to be pretty hard to kill 6 wolves if we don’t understand the basics of combat.
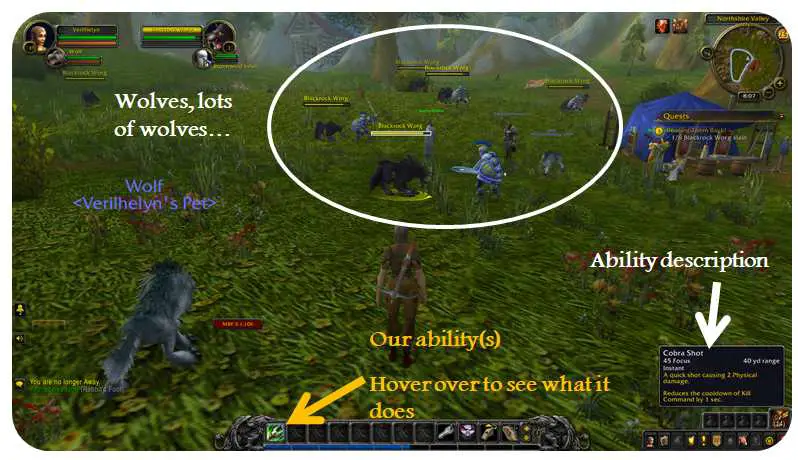
To start out we head to the west because our map indicates that is where we will find the wolves we are looking for. Sure enough, as we head to the shaded area there are wolves as far as the eyes can see.
Each wolf has a yellow health bar over its head. The bar is yellow in this case because the wolf is neutral to your character. You can walk near enemies with a yellow bar without worrying about being attacked.
As you progress further you will see enemies with red health bars who will attack you if you get close. When a red health bar enemy chooses to attack you it is called “aggro”.
Basics of combat and abilities
Enough about health bars, it is time to take down some wolves. As a hunter, in this case, we can attack from a distance by right-clicking on the wolf once. Once you have started combat (picked up aggro), your character will repeatedly attack without having to click again (called auto-attacking).
This isn’t very fast, though. If we want to take down the monster before does too much damage to us, we need to use abilities. In this case, our hunter has one spell called Cobra Shot which is bound to the ‘1’ key on the top of the keyboard.
If you don’t know what a spell does, you can hover over it to pop up a box with a description. This box will tell you the name of the spell, how much resource it costs (45 focus for Cobra Shot), the range (40 yds), how long it takes to cast, what it does, and interactions it has with other abilities.
After you use an ability a gray overlay may appear over your spell and rotate clockwise. If it does, the spell is on “cooldown” and cannot be used for a set period of time (which is also shown when you hover over the spell).
As you raise your level, the way you use these abilities matters a lot. In fact, there is an optimum order in which you should cast your spells — called a rotation. If you want to read more about rotations, check out our Rotation Guide for Beginners. However, at lower levels, it is only important to understand what spells do and use them as much as possible!
Looting and Turning In a Quest
Alright, we have right-clicked and button-mashed the ‘1’ key to defeat a wolf.
Defeated enemies can be clicked on to “loot” them and receive items. You will know you can loot a defeated enemy if there is a faint sparkle around their body.
As a tip to speed things up, you can also Shift + Right-click to automatically take everything from a defeated enemy. Enemies can drop everything from garbage items to gear for your character.
With the 6 wolves defeated, it is time to turn your quest in.
Now, the quest log shows a gold question mark, and the shaded area on the map is gone. Additionally, there is a gold question mark on the minimap. Just as simple as it was to pick up a quest, we are going to make our way back to the gold question mark, Marshal McBride, and click them again to turn in the quest.
Back at Marshal McBride, we click on him and another window pops up.
In the window is the title of the quest, some dialogue, and the reward you earned. Some quests allow you to select your reward when completing the quest. For this quest, however, we only have the option of receiving the Chaser’s Belt. We’ll take it and accept another quest to kill 8 Blackrock Spies.
Your Next Steps
Great! We have now finished a quest and obtained a new piece of gear called the Chaser’s Belt. With a better understanding of questing, combat, and movement in WoW, you are ready to learn more about gear.
You can check it out here: Part 5: Introduction to Gear.
If you are looking for another one of the guides in the series, you can navigate to it below:
- Introduction to Guide For New WoW Players
- Creating Your Character
- The WoW User Interface
- You are here
- Introduction to Gear in WoW
- Items in World of Warcraft
- Professions in World of Warcraft
- Dungeons and Raids in World of Warcraft
- Player vs. Player (PvP) in World of Warcraft
- World of Warcraft (WoW) AddOns for Beginners


Leave a Reply