A quick guide to customizing your user interface (UI) in World of Warcraft!
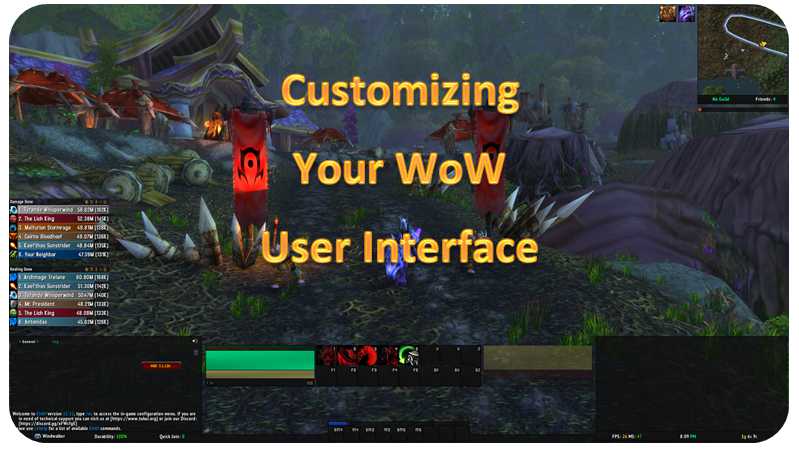
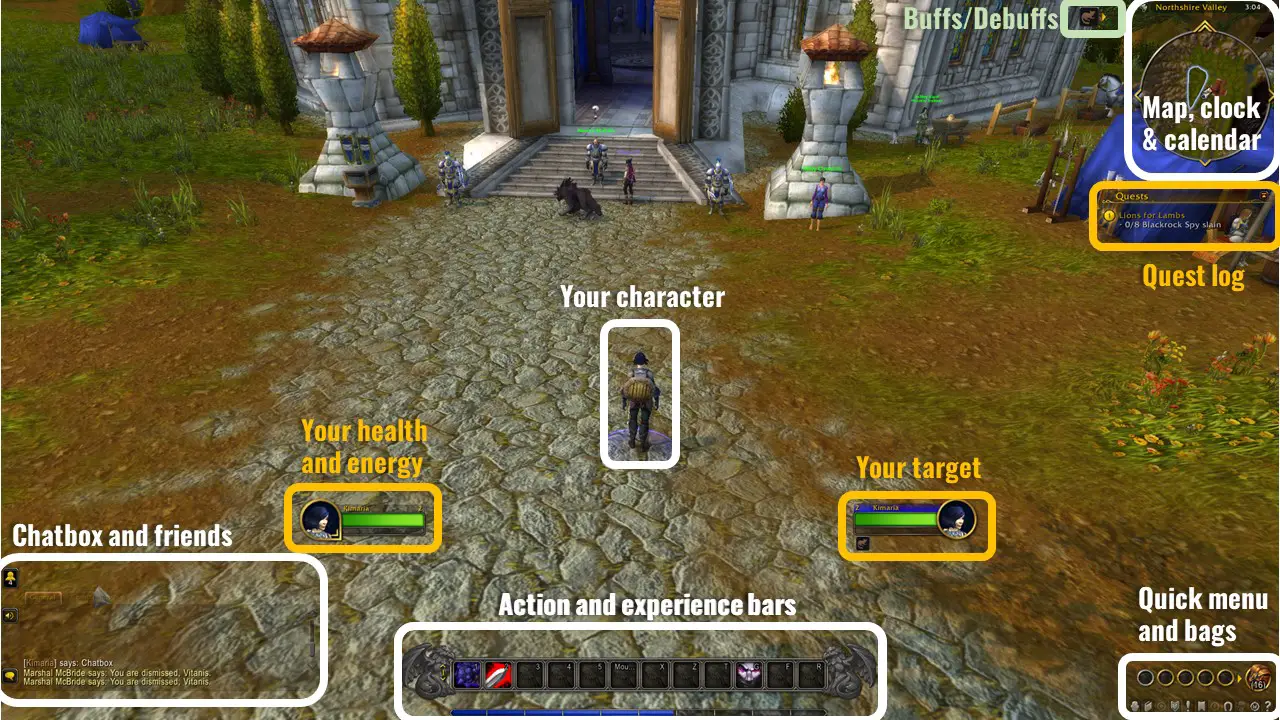
One of the quickest ways to improve your gameplay in World of Warcraft is by customizing your user interface (UI). As silly as it may sound, the location of various windows in your UI has a major impact on how well you play. If you look at the default UI, you’ll notice that there is a lot of space between items on the screen which can make it hard to focus on your character and everything else at the same time. Luckily, there are several addons you can use to make a better UI!
You can customize your World of Warcraft user interface with a UI replacement addon like ElvUI, or you can build your own layout from scratch with other WoW UI addons. If you choose to build your own, you’ll need to download multiple addons but you’ll have more control over the final look and feel. ElvUI, on the other hand, is a single download that makes it easy to get up and running with a new layout quickly.
Let’s look at both options a little closer to help you decide which one is right for you!
Option 1: Custom User Interface with ElvUI
If it is your first time customizing your user interface, you may want to consider using a UI replacement addon like ElvUI. This can be a great option for newer players because it is easy to set up and takes care of a lot of the heavy lifting for you.
In my opinion, here are some of the most notable strengths and weaknesses of using ElvUI:
ElvUI Strengths:
- An easy first-time setup process
- Several built-in styles and templates
- Can share your settings and styles through websites like wago.io
ElvUI Weaknesses:
- Adjusting some aspects of the templates can be difficult
- Not a lightweight addon, can use significant RAM/CPU to run
Fortunately, there is no risk in giving ElvUI a test run since it is free and can be easily disabled if you don’t like it. Let’s look at how you can download and setup ElvUI now.
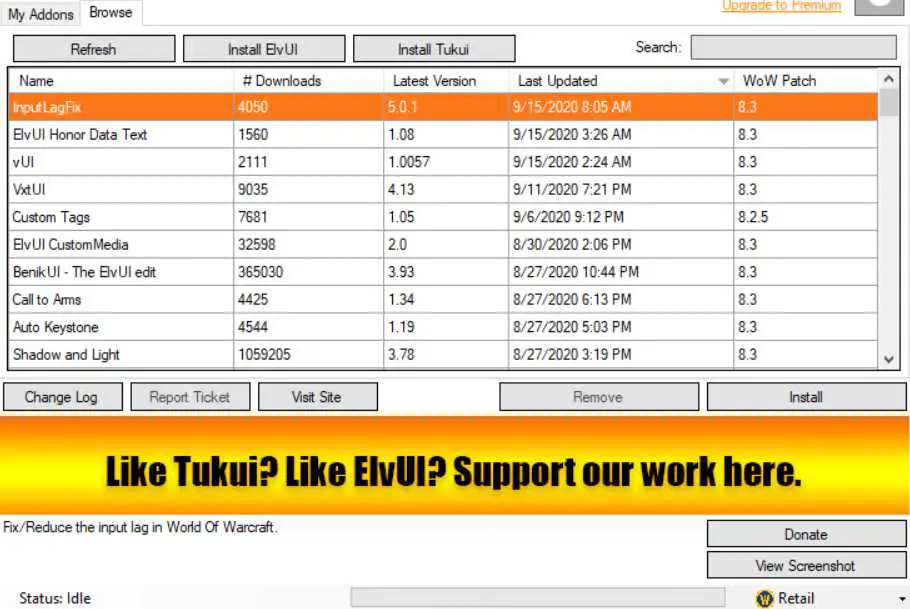
Step 1. Download the ElvUI addon files from tukui.org
Unlike many AddOns for World of Warcraft, ElvUI is best downloaded from the creator’s website. It can be downloaded at tukui.org directly or through a desktop client that you can get through the site.
If you download the client, you will have to register an account but it will be easier to keep the addon up-to-date.
After creating an account and signing into the client application, you can simply navigate to the “Browse” tab and select “Install ElvUI.” You can install several AddOns through this screen for both Classic and Retail WoW.
You can change the dropdown in the bottom-right portion of the window to switch between game versions.
The other option is to download the files directly. This means that you will not have to register an account, but you will need to re-download and replace the folder anytime you want to update.
If you are not sure how to install addons manually, check out my Beginner’s Guide to Addons.
Step 2. Follow the in-game setup process
Now that you have the ElvUI AddOn installed, it is time to launch the game. Upon entering the world, a new “ElvUI Installation” box will pop up.
Press “Continue” to launch the setup process.
Most of the options in the setup process are pretty straightforward and are based on your desired style so I won’t dive into great detail here. However, there are a couple of steps in the process that I want to talk about so you know what to expect.
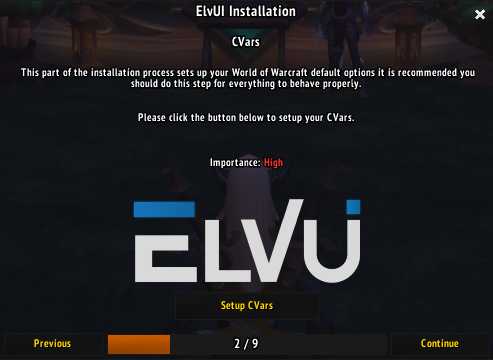
Setup CVars
The second screen in the ElvUI setup will ask you to set your CVars by clicking on the “Setup CVars” button under the ElvUI logo.
CVars are game-wide settings that control things like your viewing distance or nameplate behavior. I would definitely recommend applying ElvUI’s CVar settings for the best experience (but you can reset back to the default later if you don’t like any of the changes that were made).
After clicking “Setup CVars” a prompt should appear and let you know that those settings were changed. Press “Continue” again.
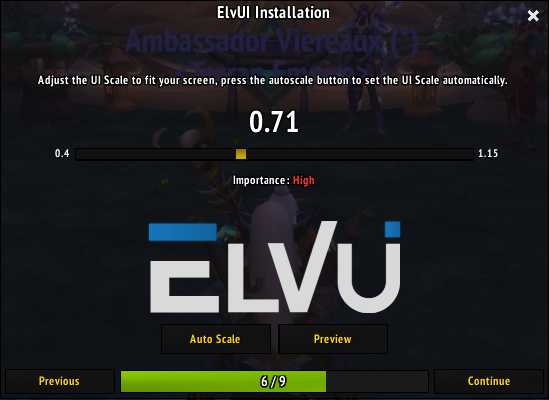
Autoscale
On the seventh step in the process, you’ll be asked to adjust the scale of ElvUI. You can either select “Auto Scale” or can use the slider and preview button to experiment with the size until it looks the way you want.
Just make sure to take advantage of the “Preview” button either way!
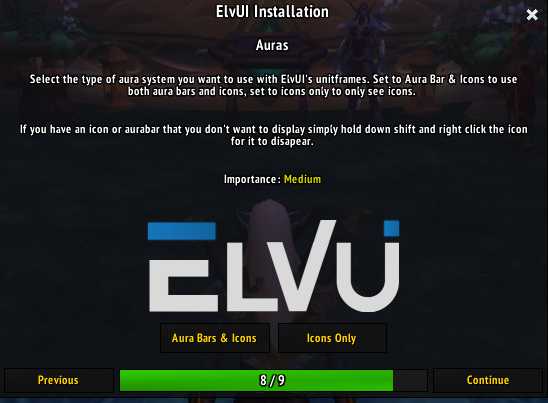
Auras
The eighth screen will ask you to choose between setting up “Aura Bars & Icons” or “Icons Only.”
This step refers to the health and target bars on your screen. If you choose to include aura bars, it will show add a bunch of bars above your health frame showing how long you have left on each buff/debuff.
This can quickly clutter things up in my opinion, so I like to choose “Icons Only.”
3. Refine your UI layout and appearance
Great! You have now completed the basic setup for ElvUI. While you could stick with the default settings and layout, there is a good chance you will want to refine things further.
To make additional changes, you will need to type /elvui or press ESC and select the ‘ElvUI’ option in the game menu.
Upon doing this, a settings box for the AddOn will open with many options. You can navigate through different modules in the left menu.
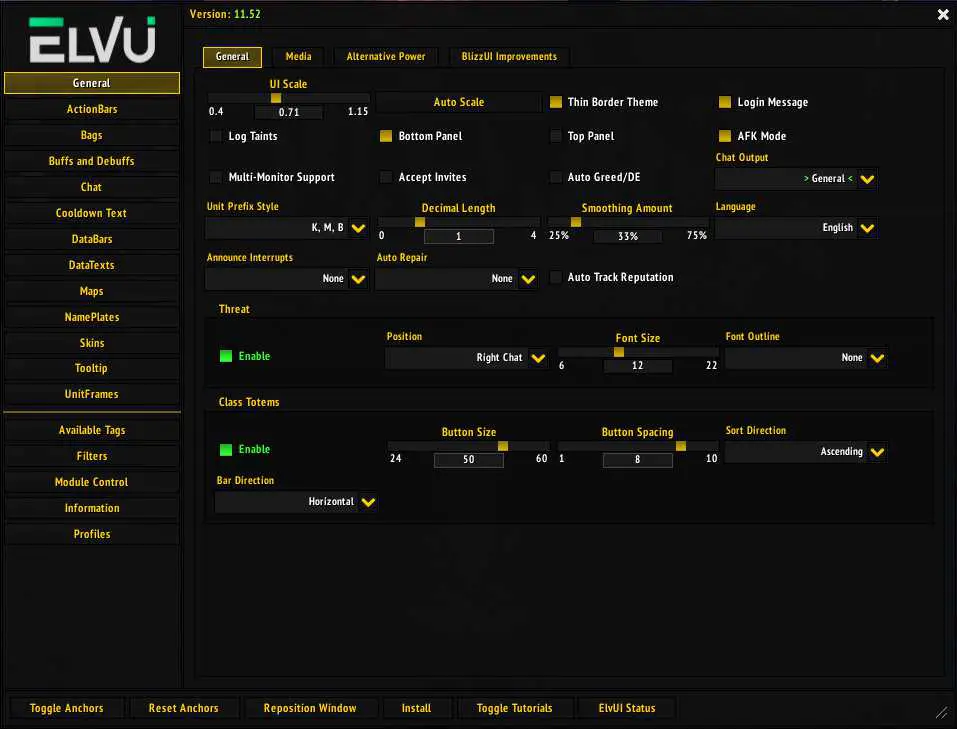
I could spend an entire article (if not a series of articles) walking through all the potential options available. If you want to deep dive into the modules and options, I would recommend reading this detailed guide on Wowhead.
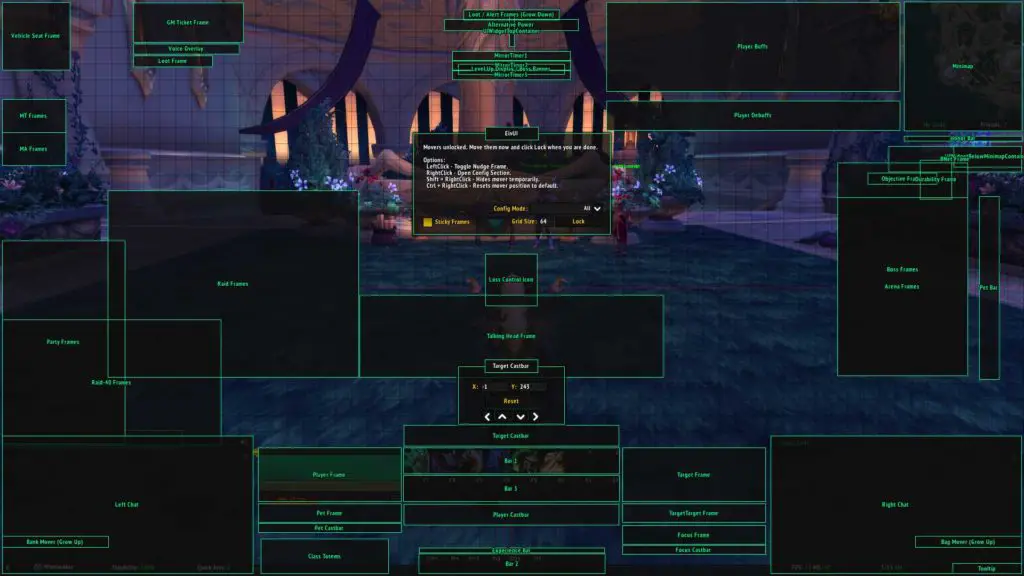
For now, I want to point out the “Toggle Anchors” button in the bottom-left corner of the ElvUI settings window. When selected, this button will turn on the ability to change the layout of any item in your UI. It is also very helpful because it provides the names of the various elements and allows you to drag them wherever you would like.
The other really helpful resource for getting started is the ElvUI profile sharing offered on wago.io. After navigating to the website, you will find a list of ElvUI profiles for every class and specialization in the game. You can either scroll through these for inspiration or you can import them into your game.
To import a profile, simply find a layout you like on wago.io and click on the option to “COPY ELVUI IMPORT STRING.” Then, navigate to your ElvUI settings window -> “Profiles” in the left menu -> “Import Profile” and paste the string you just copied.
Alright, that is it on ElvUI for now.
Option 2: Building a custom UI from scratch
The other path you can take is to build your UI from scratch with the help of one or more UI addons. While it sounds difficult, there are many easy-to-use addons available for this purpose.
Here are the strengths and weaknesses of building your own UI:
Ground Up UI Strengths:
- Only download and install the addons you need and keep things more lightweight
- Complete control over every aspect of your UI
Ground Up UI Weaknesses:
- Need to manage several addons
- A bigger time investment to set things up the first time
Personally, I like to build my own UI and have done so for many years. Let’s talk about a few of the things I have learned, and talk about which UI addons are the best.
Best WoW UI Addons
To start building your UI, you’re going to need to download the right addons.
For this article, we will look at which addons are the best choices for your action bars, unit frames, nameplates, map, and bags. The addonsI cover are just a few of the many options available but I’ve done a lot of testing and these recommendations should be a good starting point.
Best Action Bar Addon
One of the most popular action bar addons is Bartender 4. It is extremely easy to use.
If you want to see a comparison of all the major action bar addons check out my Best Action Bar Addon article.
To begin, type /bt in your chat box or find the icon and right-click on it. From there you can turn off the default artwork, unlock the positioning, change the size and number of buttons, and add many other customization options.
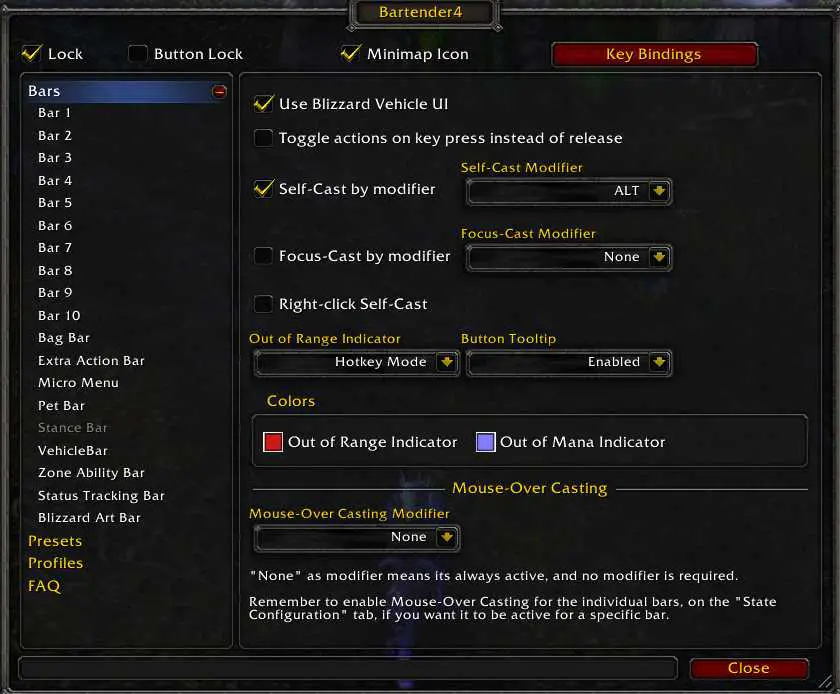
To move bars on your screen, simply uncheck the “Lock” box in the top-left portion of the Bartender settings window.
You can change the size, padding, and number of icons by navigating to the bar you want to customize in the left menu. The “Key Bindings” button is also extremely helpful as you can hover over an icon and press the key you want it to be bound to (or press ESC while hovering to delete a bind).
If you need more help setting Bartender4 up, check out this YouTube video I made:
Best Unit Frame Addon
More than any other category of addon, there are many different types of unit frames and nameplates. The term unit frame typically refers to the health/resource bars for your character, target, and party or raid members.
In contrast, nameplates are the visual indicators of health that appear above NPCs or other players in the World.
For unit frames, there are many good options. While I will only mention two of them by name, there are many others that are tailored to the types of content you play. For instance, if you are a healer who raids, the Healbot or VuhDo unit frame addons are extremely helpful.
To give you an idea of what a unit frame addon looks like, here is an example of the Shadowed Unit Frame and Z-perl Unit Frame AddOns.

The examples above are the default appearance for the respective addon. If you don’t like an aspect of the appearance, like having a portrait, you can change it in the options.
For this guide, I will show you a basic example of a Shadowed Unit Frame setup.
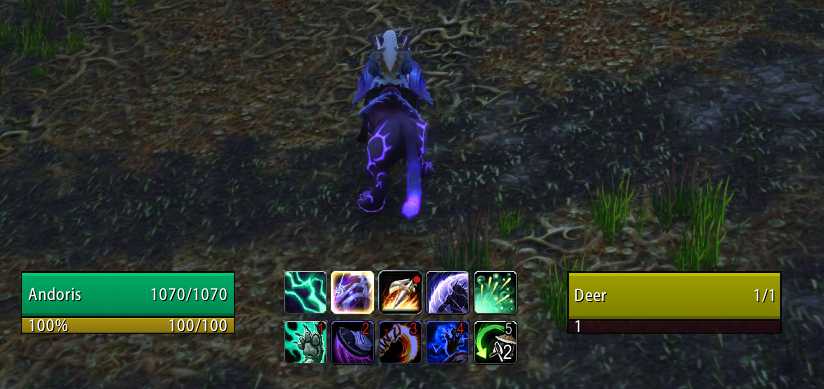
For this example, I disabled some of the default units so that I only have a player, pet, target, party, and boss unit frame. You can access this menu and all the options by typing /suf in your chat.
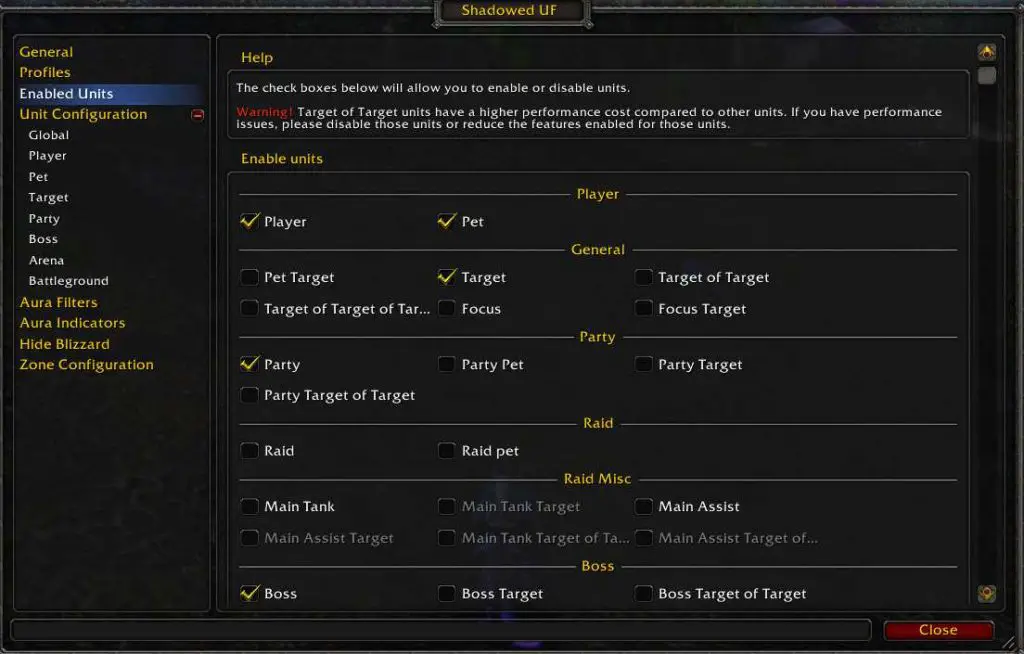
I then unlocked the unit frames under the “General” option and moved them where I wanted. Finally, I disabled the portrait for the “Player” and “Target” units. The end result is minimalistic health bars located directly under my character on either side of my spell bars created with Bartender.
Best Nameplate Addon
In addition to unit frames, you can also customize your nameplates which are the health bars that appear above enemies.
There are several different AddOns that offer great-looking nameplate replacements. Three of the most popular are Tidy Plates, Threat Plates, and Plater. To help you decide, here is an image of the default appearance of each AddOn.
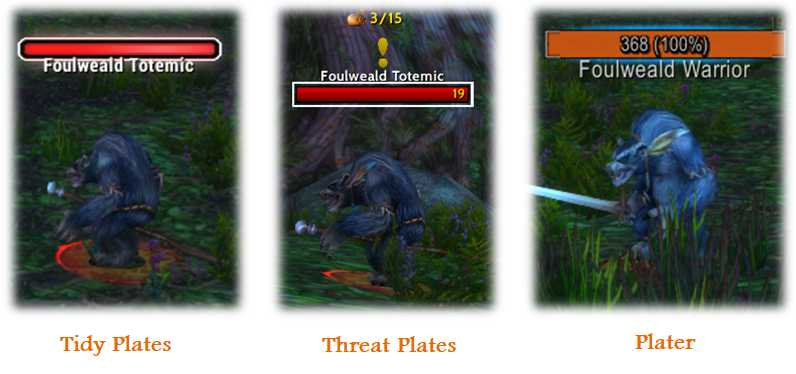
I personally prefer Threat Plates, but any of these is a great option. Fortunately, there is very little setup required for most nameplate addons. If you want you can customize them, but I find that the default settings work well enough for most content.
For a deeper dive into comparisons between the major nameplate addons, check out my YouTube video here:
Best Map Addon
While you are making over your UI, you can’t forget about your map.
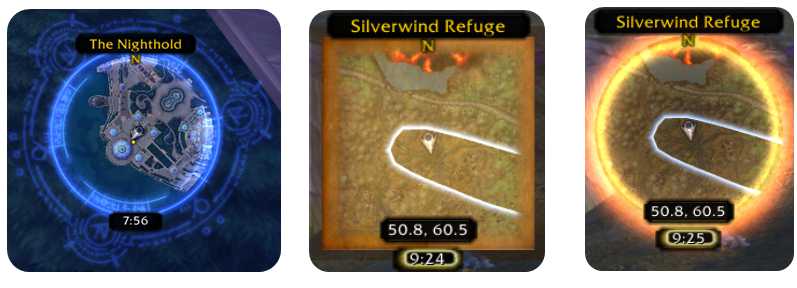
The addon I recommend for customizing your map is called SexyMap. In addition to changing the shape of your map, you can customize the border with various auras and animations. You can also add coordinates to your map in the AddOn settings.
Here is an example of a few cool map borders you can select:
Best Bag Addon
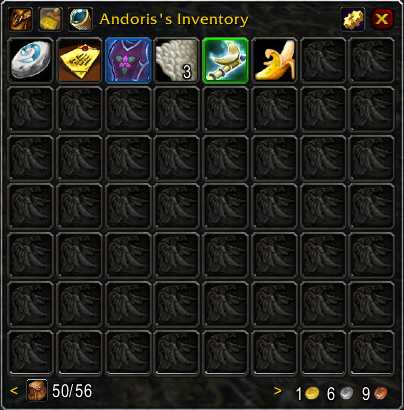
The last area of your user interface to rework is your bags. While there are many addons for this purpose as well, the most popular one is Bagnon.
Bagnon is clean, easy to set up, and allows you to see all your items in one searchable window. As with the other addons we have mentioned, you can use the settings window to adjust things like the number of columns, scale/size, and color scheme.
Putting it all together
Now that I’ve talked about the best action bar, unit frame, nameplate, map, and bag addon, it is time to put it all together. With a little bit of tinkering (and with the inclusion of the Details! Damage meters addon), I created the rough custom user interface shown below in a matter of about 15 minutes.
While it is not the most beautiful UI, it is certainly an improvement over the default UI as my spells and health are now located closer to my character.
Other helpful WoW User Interface (UI) Addons
With relatively few AddOns, we created a new UI from scratch!
There are so many different UI-altering addons available that it would not be practical to cover them all. However, there are several other popular ones that I think are important to at least mention here. They are:
- MoveAnything – Lets you hide or move any UI element in the game.
- WeakAuras – Powerful AddOn which enables you to create “auras” or graphical representations of events or information in the game.
- Dominos – Action bar customization addon similar to Bartender 4.
- OmniCC – Adds countdown text to spells, items, and abilities that are on cooldown
- Prat – AddOn which adds helpful functionality to your chat window.
- Details! – My preferred combat meter AddOn, could also use Recount or Skada.
Final Thoughts
Improving your user interface setup can significantly improve your gameplay or in-game experience. In general, there are two approaches you can take to change your UI — use a UI replacement addon like ElvUI or build it yourself from scratch.
While there are strengths and weaknesses of each approach, it ultimately comes down to personal preference.


great guide
Thanks for this help.
You’re welcome, glad it was helpful!