A Beginner’s Guide to Navigating and Interacting in the World of Warcraft
Welcome to part 3 of our ultimate guide for new World of Warcraft players. In this post, we are going to look at the World of Warcraft user interface (or UI for short).
If you missed one of the previous guides, feel free to read them here:
One of the most confusing parts about starting to play World of Warcraft is the user interface (UI for short). But what is a user interface?
Simply put, the user interface — or UI — includes the collection of buttons, bars, and images on your screen. It is important to understand the layout of the UI because it is the way you will interact with your character, friends, and everything in World of Warcraft.
Let’s jump right in!
World of Warcraft User Interface (UI) Overview
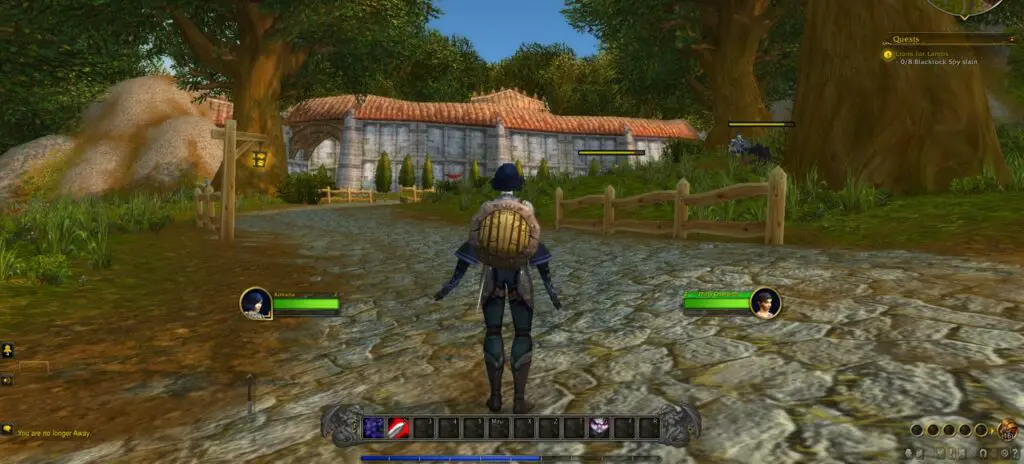
When you first log into your new character, it may not be clear what the different buttons and bars do. To help you learn the basics, here is a labeled image of the default UI.
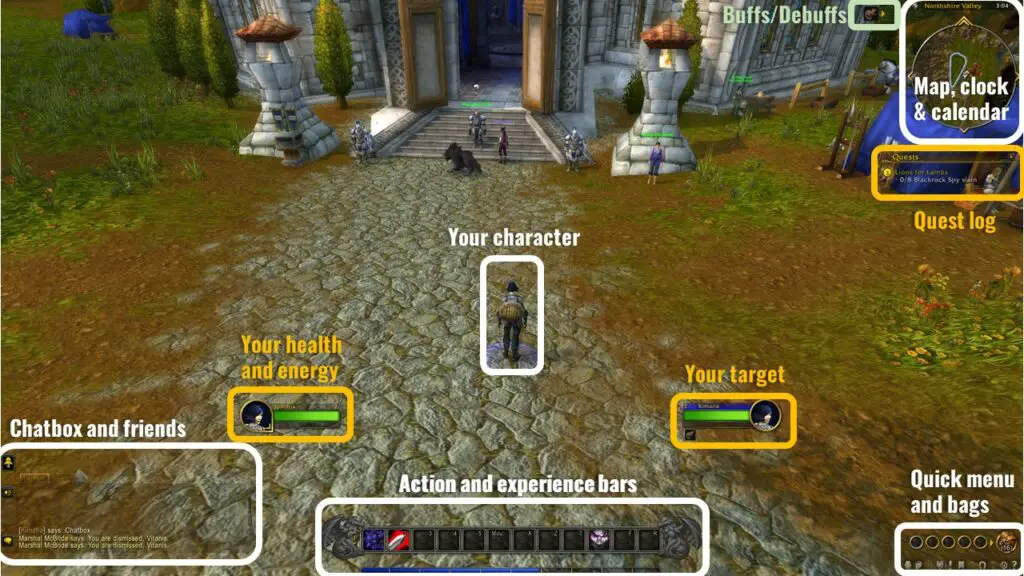
This image may be enough to get you started but we will dig into each of these components in more detail.
As you get more comfortable with the default UI, you can also start making tweaks to the location of the various pieces. To do that, all you need to do is press ESC and then click on Edit Mode. You can also customize your layout a lot more as you start to use addons — custom plugins created by the community to enhance your UI and gameplay.
However, since this is a beginners’ guide, we’ll stick to getting comfortable with the default layout first. If you are interested in building a custom UI, check out my article: Improve Your World of Warcraft (WoW) UI – ElvUI & Custom Setup.
Health bars
By default, and upon logging in the first time, your character’s health (green) and resource bars will appear to the left of your character in the World of Warcraft user interface. Additionally, a photo of your character and your level will appear here.
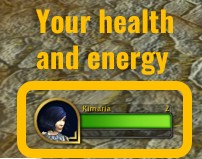
If you play as a class with a pet, like a hunter, or warlock, you will also see your pet’s health and energy in this area.
Health (also called hit points or HP) is the total amount of damage your character or pet can take before you die. You can see your percent of health remaining and the value of total health by hovering over the green bar.
The resource bar shows the amount of power you have to use your abilities. In the case of the character in the image (a warrior), this resource is called rage. My character has zero rage, so the bar is empty, but as I use abilities, it will fill up with a red color. I can then use rage to use even more powerful abilities.
The name of the resources used varies from class to class (focus, mana, rage, etc…) but are all used for the same purpose — to use spells and abilities.
Target Health Bars
Immediately to the right of your character is your target’s health bar. If you don’t have a target this area will be empty.
To “get” a target, you will need to left-click on a character in the world. Additionally, pressing the tab key will target the closest target if there is one in range. Pressing the tab key multiple times will rotate through all available targets nearby.

As with your character, the frame for your target shows HP and resources. In the example image, the selected target (“Marshall McBride”) has a health bar in green, but the resource area is empty. This is because this target is a non-player character (NPC) and does not use a resource.
It is also important to note that the color of your target’s health bar indicates whether it is friendly, neutral, or hostile. There are three main colors and reactions you can get from units in the world, including:
- A green health bar, like in the image, is a friendly unit and will not attack (and cannot be attacked).
- A yellow frame is neutral and will not attack you if you walk near it.
- A red health bar — or red name above the character’s head — means that the character will attack you if you get too close to it.
Buffs and Debuffs
In the top-right area of your screen are little icons that indicate current buffs or debuffs impacting your character. A buff is a spell that makes your character more powerful. A debuff is the opposite, it lowers your character’s power or does damage to you over time.
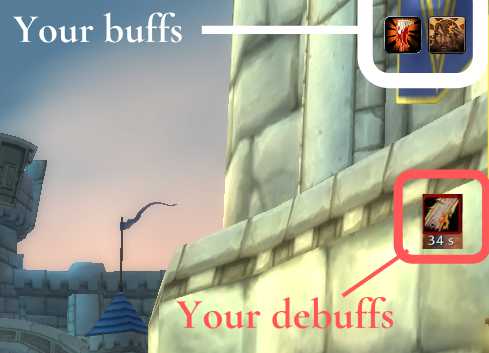
The remaining duration on a buff or debuff is shown below the icon.
In the image, the debuff shows 34 seconds remaining, while both buffs have no time, which means they do not expire. If you ever see an icon in this area and are not sure what it does, you can hover over it to see the buff/debuff name and effect.
Minimap, Clock, and Calendar
Directly to the right of the buff/debuffs are your minimap, clock, and calendar.
The minimap is the circular map with the arrow in the middle. The arrow shows the location of your character and which direction you are facing. It will also show a lot of icons for important landmarks in the game.
As an example, you may see a gold “!” on the map which indicates a new quest. A gold “?” on the other hand, indicates that you have a quest to turn in. In part 4 (Questing, Combat, and Movement), we will look at questing in more detail.
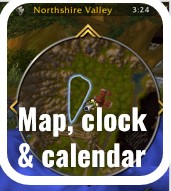
It is also helpful to note that you can adjust what icons appear on your minimap by left-clicking the binoculars. Upon doing so, a list with checkboxes will appear. If you see an icon you don’t recognize on your map, you can use this list to see what it represents.
Above your minimap, is a text box that tells you where your character is. Clicking on the name of your location will open a large version of the world map. This same map can be opened by pressing the “M” key on your keyboard.
To the far right of your location is the calendar. Clicking on the calendar shows when certain in-game activities are scheduled to take place. If you have joined a guild (an organized group of players in your realm) you can also see your guild events as well. If you are interested in finding a guild, check out my article: 9 Ways to Find a WoW Guild.
You will also see a clock above your minimap that can be clicked to set a stopwatch or alarm.
Chatbox
On the bottom left-hand side of the World of Warcraft user interface is the chat box and social tools.
If you click on the icon that looks like a person (or press the letter ‘o’ on the keyboard), it will pull up a list of your friends specific to World of Warcraft or via Blizzard’s BattleTag or RealID friend systems. Additionally, this tab will allow you to ignore other players, send invites to friends to play via e-mail, join friends in content, and manage raid groups.
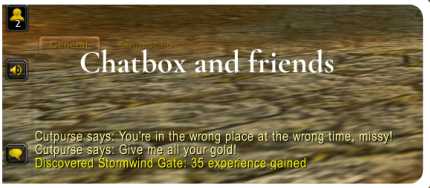
The icon below that, which looks like a speaker with a sound wave coming out of it, will select the chat channels you would like to join. You can play with these settings if you would like but there is generally no reason to because the game will manage your channels for you as you travel to different areas.
The last icon down the left side looks like a speech bubble and selects the method of chat you would like to use. You can activate these methods by clicking on this icon or by including a forward slash ( / ) in front of the name of the chat type. As a few examples, if you type /say -> spacebar, you will now be in a mode that will only talk to players near you. If you type /party or /p -> spacebar, you will talk to the group you are in no matter where your party members are.
This icon also includes emotes and voice emotes. These are commands that your character can perform to do things like thank other players, be shy, or even make train noises and gestures (/train).
Sending Messages
The actual chat box is displayed with a faint grey outline to the right of the icons. Pressing ‘enter’ will activate the ability to chat and show you which method you are using (say, yell, guild, etc…).
By default, your chat box is set to the General tab. This is where chat communication is shown.
However, there is another tab at the top of the box called ‘Combat’. If you switch to this mode, it will show you how much damage your character is doing or taking from monsters or players. It can be a helpful place to look if you die and are not sure what killed you.
Action and experience bars
The action and experience bars are found in the bottom center of the World of Warcraft user interface. The action bar is the set of square boxes, while the experience (XP) bar is the purple or blue rectangles below it.
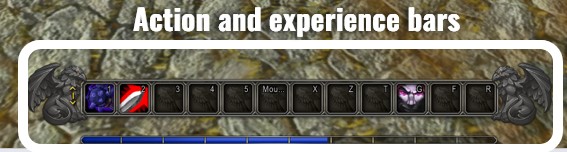
Experience Bar
The experience bar shows how much XP you have at your current level and how much is needed to reach the next level. If you hover over this bar, it will show you the detailed numbers and percentages related to XP.
If the bar is purple, that means your character is “unrested” and you will gain experience at a normal rate.
Conversely, a blue bar means that your character is “rested” and will gain experience at a faster rate. You can become more rested by logging out in large cities or inns.
You will know you are in a rested area if your health frame shows ‘ZZZ’ next to your character image rather than your level.
The Action Bar
The action bar shows you which spell(s) your character can use and how long you need to wait to use them again. The time you wait between using a spell is called cooldown.
If your spell is on cooldown, the colorful icon will be covered in a grey overlay which moves clockwise until the spell is ready to use again. By default, your action bar has 12 spaces. That should be enough to get started, but you will want to add more eventually.
You can do that by accessing the settings in the game menu. To open the menu, press ESC, then click on “Options” and “Action Bars”. From there, check the boxes to enable new bars for your spells.
You can use the spells in your action bar either by left-clicking on them or pressing the corresponding key. By default, the action buttons are set to the number, “-“ and “=” keys on the top of your keyboard. If you are just beginning, you can use either of these options.
However, in the long run, the best option is to learn more about keybinding, which is the process of assigning spells to the best keys for quick reactions in the game. If you are interested in learning more now, you can check out this Wowhead keybinding guide or watch the video I included below:
Quest Log
As the game progresses, you are going to collect a lot of quests and you’ll need a way to keep track of what you are working on. Luckily, the UI shows a log of your current quests on the right side of the screen.
You can remove quests from the log on the screen by clicking on the one you want to hide while holding shift.
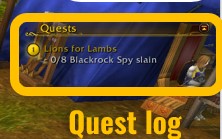
If you have a lot of quests, not all of them will fit on the screen, so you’ll need to press the keyboard shortcut ‘L’ to open the full quest log, or click on the icon in the quick menu, which we’ll talk about now.
Quick Menu and Bags
The bottom-right-hand corner of the World of Warcraft user interface is where you will find your bags and the quick menu.
When you first log in, you will only have one bag called your “backpack”. In the example image, it is the brown bag with the number 16 in parentheses over it. You can open your backpack by clicking on it or pressing the ‘B’ key for short.
You also have 4 other slots to place regular bags, and 1 slot for a reagent bag as you find or purchase them throughout your adventure.
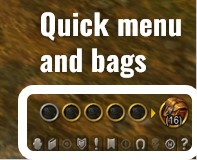
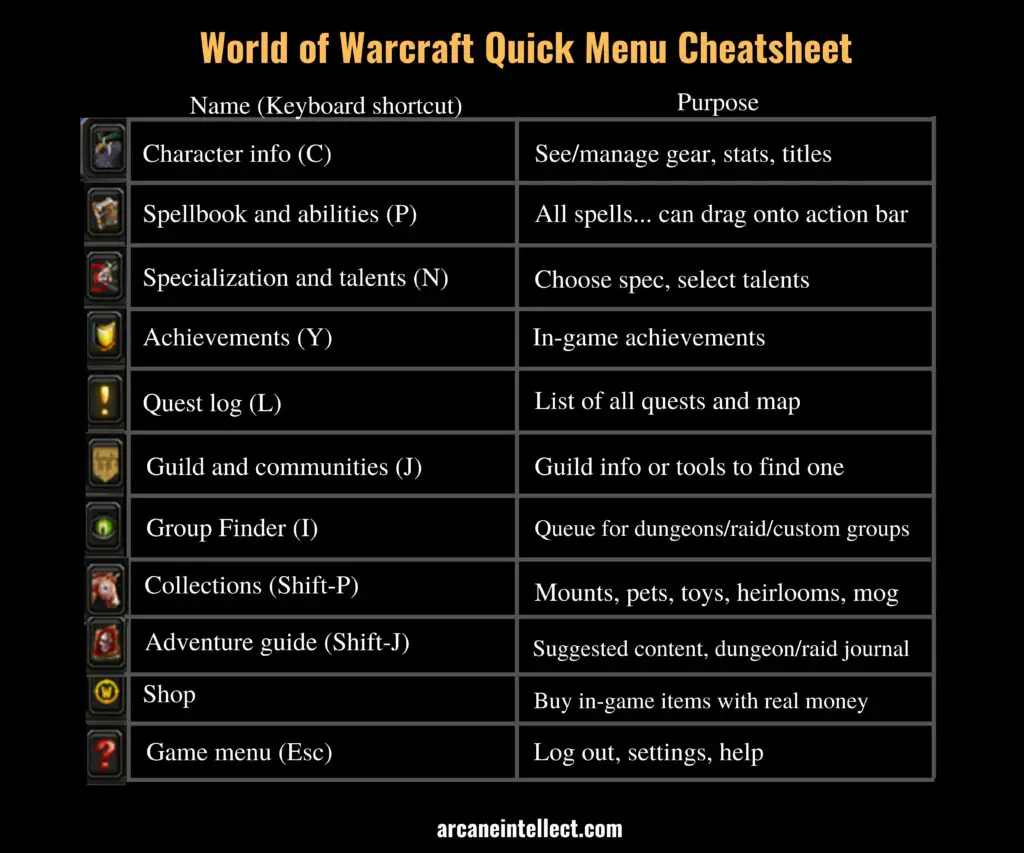
Directly below your bags is the quick menu. The quick menu contains 11 icons which offer a fast way to navigate the various features in WoW. To keep things simple, I created a quick cheat sheet that shows what each quick menu icon does:
Next Steps
If you made it to the end, congratulations! There was a lot to cover on the World of Warcraft user interface. With a character created and an understanding of the user interface, we can now jump in and start playing the game.
Check out part 4: Questing, Combat, and Movement.
If you are already familiar with the topics in part 4, feel free to bounce around to any part in the guide:
- Introduction Guide for New WoW Players
- Creating Your Character
- <- You are here
- Questing, Combat, and Movement
- Introduction to Gear in WoW
- Items in World of Warcraft
- Professions in World of Warcraft
- Dungeons and Raids in World of Warcraft
- Player vs. Player (PvP) in World of Warcraft
- World of Warcraft (WoW) AddOns (for Beginners)


Leave a Reply